
티스토리 뷰

🤔 1. redux-persist를 사용한 이유
프로젝트 중 로그인 기능을 구현하는데, 서버로부터 받아온 회원정보를 저장해야했다. 예를 들어 로그인한 유저의 username, email 등은 프로젝트 전반에 필요한 정보이다. 그렇다는 말은 데이터를 전역적으로 관리할 필요가 있다는 뜻이기도 하다. 이번 프로젝트에서는 Redux-toolkit을 사용하기로 정했기 때문에 Redux의 store에 유저정보를 저장하여 전역적으로 값을 관리하기로 하였다.
그런데 하나 문제가 생겼다. 로그인 API request에 대한 response에 담겨있는 유저 정보를 store에 저장했을 때, 직후에는 값이 관찰되지만, 새로고침을 하거나 다른 페이지로 이동했을 때 값이 사라지는 걸 확인했다.
이때 redux-persist를 사용하면 store를 유지할 수 있다. 로그인 할 때 서버로부터 받은 jwt를 localStorage에 저장해두면 새로고침을 하거나 페이지 이동을 하여도 로그인을 유지할 수 있듯이, redux-persist를 사용하면, 값을 localStorage나 sessionStorage에 저장하여 데이터를 유지할 수 있다.
😎 2. base code (Redux-toolkit)
먼저, Redux-persist를 사용하기 전의 redux-tookit만 적용된 나의 코드는 아래와 같다.
/store/userSlice.js
import { createSlice } from '@reduxjs/toolkit';

const initialState = {
  id: '',
  email: '',
  username: '',
};
const userSlice = createSlice({
  name: 'user',
  initialState,
  reducers: {
    setUser: (state, action) => {
      state.email = action.payload.email;
      state.username = action.payload.username;
      state.id = action.payload.id;
    },
  },
});

export const { setUser } = userSlice.actions;

export const selectId = (state) => state.user.id;
export const selectEmail = (state) => state.user.email;
export const selectUsername = (state) => state.user.username;

export default userSlice;
userSlice.js 파일에 user와 관련된 state를 관리하기 위한 slice를 만들고 필요한 것들을 export 해주었다.
/store/index.js
import { configureStore } from '@reduxjs/toolkit';

import userSlice from './userSlice';

const store = configureStore({
  reducer: {user: userSlice.reducer},
});

export default store;
configureStore의 reducer 에 객체 형태로 reducer들을 전달하면 내부적으로 하나의 root reducer로 합쳐주기 때문에, 나의 경우 굳이 combineReducers를 사용하지 않는 편이라 위와 같이 작성하였다.
src/index.js
import React from 'react';
import ReactDOM from 'react-dom/client';
import store from './store/index';
import { Provider } from 'react-redux';

import './index.css';
import App from './App';

const root = ReactDOM.createRoot(document.getElementById('root'));
root.render(
  <Provider store={store}>
      <App />
  </Provider>
);
store를 전역적으로 사용하기 위해 Provider로 store를 내려주는 코드이다.
여기까지 진행했을 때, 새로고침을 할 경우 Store의 값이 초기화된다는 것을 알았고, 유저 정보를 계속 저장해두기 위해서 Redux-persist를 설치하였다.
🤩 3. Redux-persist 사용하기
userSlice.js 파일에서는 수정할 것이 없다.
/store/index.js
import { configureStore } from '@reduxjs/toolkit';
import storage from 'redux-persist/lib/storage';
import { combineReducers } from 'redux';
import { persistReducer } from 'redux-persist';

import userSlice from './userSlice';

const reducers = combineReducers({
  user: userSlice.reducer,
});

const persistConfig = {
  key: 'root',
  //로컬스토리지를 사용할 것이기때문에 storage를 적어주었다
  storage,
  whitelist: ['user']
};

const persistedReducer = persistReducer(persistConfig, reducers);

const store = configureStore({
  reducer: persistedReducer,
});

export default store;
이 파일에서의 변동사항은 storage, persistReducer를 import 해오고 사용하지 않던 combineReducer를 사용해주었다는 점이다.
persistReducer(config, reducer)
reducer를 반환하는 API이다. 인자로 받은 config 객체를 reducer 함수에 적용하여 enhanced reducer를 반환한다.
- config : key와 storage를 필수로 필요로 하며, whitelist, blacklist 등의 값을 지정할 수 있다.
- whitelist: 유지하고 싶은 값을 배열로 전달한다.
- blacklist: 유지하고 싶지 않은 값을 배열로 전달한다
- reducer : 어떠한 reducer가 들어갈 수 있지만, 보통은 combineReducers로부터 반환받은, 즉, 하나로 합쳐진 root Reducer를 값으로 넣어준다.
combineReducer
combineReducer는 redux의 API 으로 여러개의 reducer를 하나의 root reducer로 합쳐준다. 기존의 코드에서는 configureStore 내부에서 이 기능을 처리해주기 때문에 굳이 사용하지 않았지만, persistReducer에 하나의 reducer를 전달하고, 반환받은 enhanced reducer를 configureStore에 전달해야 하기 때문에 여기서는 combineReducer를 사용하였다.
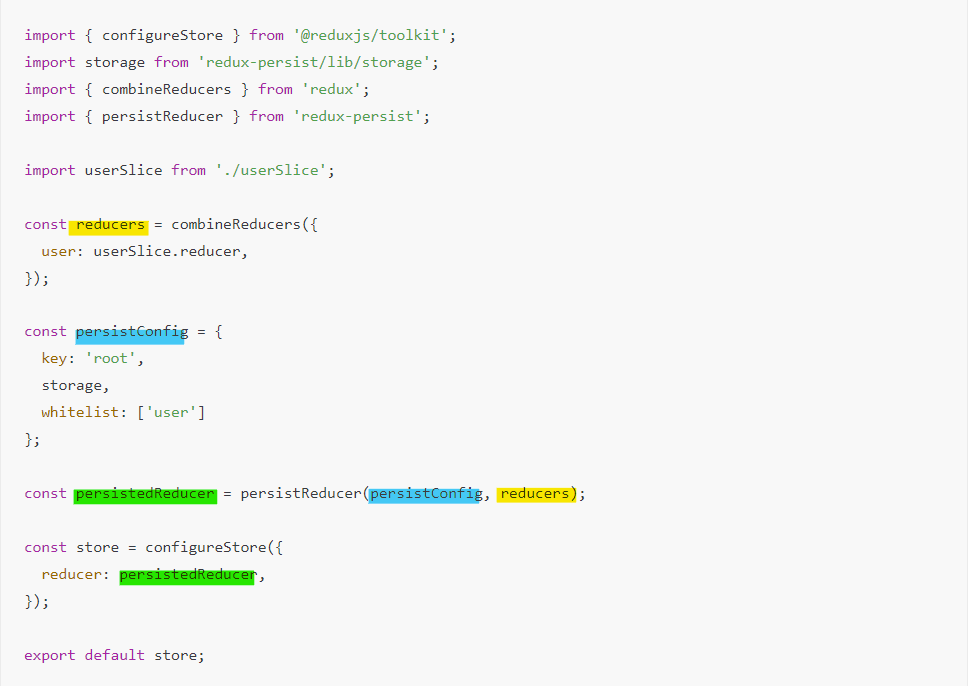
흐름이 어떻게 되는 것인지 처음 보면 헷갈리기에 같은 것끼리 형광펜을 칠해보았다.
src/index.js
import React from 'react';
import ReactDOM from 'react-dom/client';
import store from './store/index';
import { Provider } from 'react-redux';

import { PersistGate } from 'redux-persist/integration/react';
import { persistStore } from 'redux-persist';

import './index.css';
import App from './App';

export let persistor = persistStore(store);

const root = ReactDOM.createRoot(document.getElementById('root'));
root.render(
  <Provider store={store}>
    <PersistGate loading={null} persistor={persistor}>
      <App />
    </PersistGate>
  </Provider>
);
/src/index.js 에서는 PersistGate와 persistStore를 import 해온다.
persistsStore(store)
- 유지하고 싶은 redux store를 인자로 넣으면 persistor 객체를 반환한다.
PersistGate
PersitsGate는 유지되는(저장된) store의 값이 다시금 redux에 저장될 때까지 app의 UI렌더링을 지연시킨다.
- loading : 로딩 과정에서 보여줄 컴포넌트
- persistor : 로컬스토리지에 저장할 스토어 (persitsStore가 반환한 persistor 객체를 전달하면 된다.)
💥 4. 결과
여기까지 설정하면 필요한 값을 계속 store에 유지시켜 사용할 수 있다.
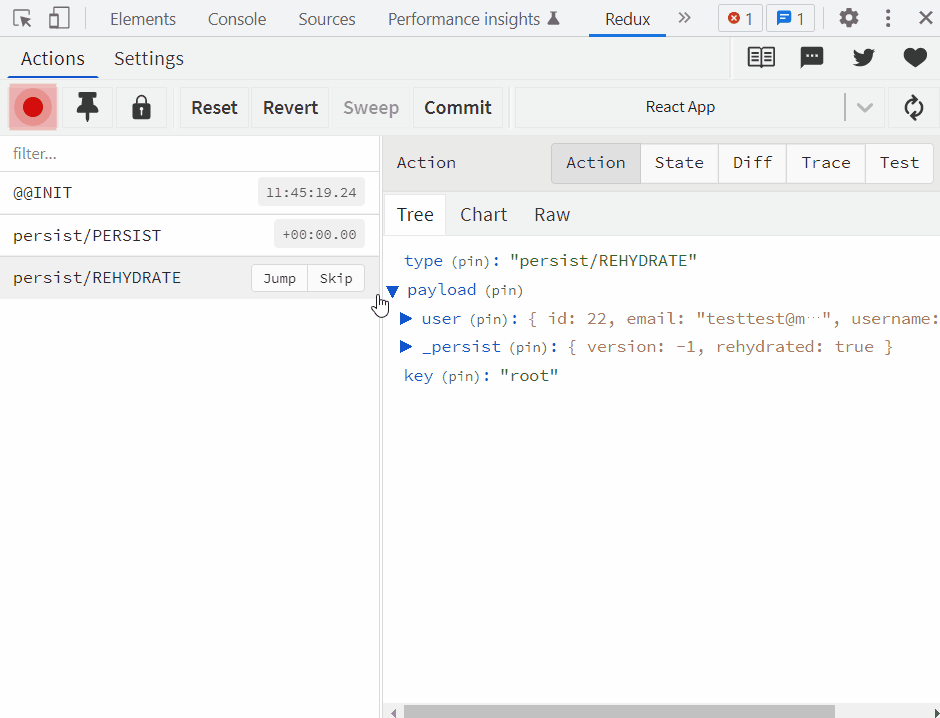
redux-developer tools로 확인하였을 때, 새로고침을 했음에도 불구하고 user의 정보를 확인할 수 있었다.

그리고 로컬스토리지를 확인했을 때, persist:root 라는 이름으로 값들이 저장되어있는 걸 확인할 수 있다. 새로고침을 할 때마다 여기에 있는 값을 가져와서 store에 저장한다.
참고 자료
https://github.com/rt2zz/redux-persist/blob/master/docs/api.md
https://edvins.io/how-to-use-redux-persist-with-redux-toolkit
'TIL' 카테고리의 다른 글
| [React] re-evaluation과 re-rendering 그리고 optimization (0) | 2023.03.03 |
|---|---|
| JavaScript의 sort는 어떤 정렬 알고리즘을 사용할까? (0) | 2022.10.30 |
| [strapi] 중복검사를 위한 커스텀 (custom) API (0) | 2022.10.04 |
| [React] 리액트의 작동 원리 (React-DOM 과 Virtual-DOM) (0) | 2022.09.22 |
| [React] useEffect 실행 시점 짚고 가기 (5) | 2022.08.27 |